Asus ROG Maximus Z690 Extreme and Extreme Glacial Motherboard Review
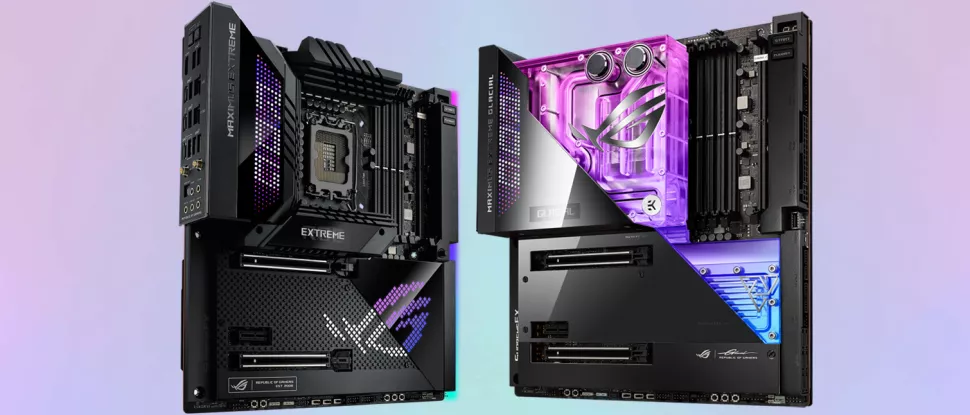
Through every generation of motherboards (and graphics cards), every board partner does their best to offer a complete lineup. From budget to flagship-class hardware, there’s something for everyone. Today we’re covering Asus’ flagships in the ROG Z690 Maximus Extreme ($1,099.99) and the water-cooled Extreme Glacial ($1,999.99). Both boards present users with the best hardware available for the platform, while the Glacial raises the bar adding a custom EKWB full cover block to cool the CPU, VRMs, chipset, and more. But are they worth the high price of admission?
Hardware-wise, both the Extreme and Extreme Glacial are the same. Both have the overbuilt 25-phase VRM, a PCIe 5.0 M.2 socket (plus four others), Wi-Fi 6E and 10 GbE connectivity, flagship-class audio, AniMe Matrix and LiveDash displays, and too many other features to list here. Although the E-ATX-size boards look different due to the water block, they both exude a premium appearance and style that works with most builds. If you’re into RGB LED lighting, both boards have you covered, with the Glacial using a lot more.Read More : Ryzen 5000 Support Finally Enabled On A320 Motherboards In our testing, both boards performed basically identically. When we bring other Z690 boards into the mix, we found them average overall, with no surprises in most tests. Our gaming results were a couple of frames per second (fps) slower than other boards, but nothing you’d notice. None of the results were the fastest or slowest but settled in nicely along the mean. Power use was slightly higher than average for both versions of the Extreme, but not out of line. In short, the two Extreme boards perform well out of the box.
Below, we’ll take a closer look at the features of the boards, including the overclocking bits, water cooling block, and any other item that makes the Extreme, well, extreme. Does it have what it takes to make our best motherboards list? We’ll answer that question and share our thoughts on if it’s worth paying such a premium for a motherboard. But first, here’s a detailed list of the Z690 Extreme and Extreme Glacial’s specifications, direct from Asus.
Starting with the Extreme, Asus uses a jet black PCB and heavy metal heat sinks and shrouds that cover an overwhelming majority of the board. The oversized and heat pipe-connected VRM heatsinks surround the socket and reach over the IO area. On top of the VRM heatsink is the customizable Asus AniMe Matrix LED display (a carryover from the company’s ROG Zephyrus G14 laptop), while just below that is the LiveDashOLED to display system information (among other things). The heatsinks around the M.2 sport small bumps to give the board a unique look and increase the surface area to dissipate the heat from the SSDs below.
The right edge is covered by a shroud hiding the horizontal connections for fans and power. The chipset heatsink sports an RGB LED-lit ROG symbol, while under the right edge is an RGB strip that runs the full length of the board. A backplate protects the rear of the board and offers some passive cooling on the VRMs. Overall, the Maximus Extreme is a good-looking board that gives off a premium vibe, but the dot matrix feature is a love-it-or-hate-it feature for sure.
The Glacial takes the premium vibe the ‘base’ Extreme has and takes it to a whole different level. The included monoblock replaces the heatsinks on the board cooling the CPU, VRMs, M.2 socket(s), and the chipset. Around the socket area, the clear plexi gives way to several integrated ARGB LEDs in the block that shine past the prominent silver Asus ROG branding. You still get the benefits of the Matrix LED and LiveDash OLED in the Glacial, and it blends in a lot better here than on the regular Extreme. Between the EK block, horizontal connectivity and shrouds, you can barely see the PCB except where you need to (where there are headers for fan, RGB, etc. The Extreme Glacial is one of the most high-end-looking motherboards available. Both boards beg to be the centerpiece of your PC.
On the ‘base’ Extreme, the VRM heatsinks rise around the socket area like seats in a sports stadium. The large heatsinks offer a lot of surface area and connect via a heat pipe to share the VRM and M.2 socket heat load. On top of the left VRM bank sits the AniMe Matrix LED, while just below that is the 2-inch LiveDash OLED screen. Both can be personalized, with the LiveDash sharing system information (think voltage and speeds) and images, while the AniMe Matrix LED is more for aesthetics and personalization. You can control what these display through the Asus Armoury software. Just above the heatsink are two 8-pin EPS connectors (one required) to power the CPU.
Advertisement
The Glacial replaces the stadium seating-like VRM heatsinks with a nickel-plated EK block that covers and cools the VRMs, CPU, and the top M.2 socket. The gloss finish reaches out over the IO panel and down to the top VRM socket which yields an even more premium look. The AniME Matrix and LiveDash OLED have a much cleaner implementation on the Glacial since it’s integrated into the block. RGB LEDs shine brightly through the thick acrylic block, backlighting the ROG symbol branding.
To the right of the socket, both motherboards look the same and have the same features. There are four unreinforced, single-side locking DRAM slots supporting up to 128GB of DDR5 with speeds listed to DDR4 6400+. Of course, your mileage will vary as reaching these speeds depends on the memory kit used and having a CPU with an integrated memory controller capable of doing so. We had no issues with our ADATA DDR5 6000 kit using XMP.
Above the DRAM slots are three (of eight) 4-pin fan/pump headers. In this case, we have the CPU_FAN, CPU_OPT, and CHA_FAN1P headers which are Q-Fan controlled by default. These headers (and the rest of the chassis fans and rad fans) support up to 1A/12W. The two pump headers (W_PUMP+1/2) output up to 3A/36W, supporting nearly all pumps designed for PC watercooling.
All of the holes on the board to the right are for the Asus ProbeIt functionality. With these, you can use a multi-meter to check voltages more accurately compared to software. ProbeIt covers all major voltages, including VCore, VIn, VDD, SA and several others. While most users don’t need this level of granularity and accuracy, I want to see everything Asus has to offer on the flagship and am happy to see it here. For those who truly push the limits of their processor, this is a useful tool to have.
Sitting between the right edge of the board and DRAM slots is the DIMM.2 socket. This slot houses the included DIMM.2 module which adds two additional M.2 sockets to the board. The add-in-card–which looks like RAM–runs at PCIe 4.0 x4 speeds for each module and supports up to two 110mm PCIe storage devices.
Along the right edge, the Extreme(s) sport a plastic shroud that covers the unsightly connectors and simple buttons. A 2-character debug LED is visible from the top, along with rectangle-shaped Start (power) and reset buttons. Sitting horizontally under the shroud are two 4-pin fan headers, the 24-pin ATX connector to power the board, and a supplemental 6-pin PCIe connector for additional board power for multi-GPU configurations. Also located here is the new 6-pin Gen2 addressable RGB connector that fits RGB WS2812B or WS2812B-based LED strips at up to 3A(5V). Sticking up around the shroud is a front panel USB 3.2 Gen 2x2 (20 Gbps) Type-C header.
The air-cooled Extreme also has the PCIe slot Q-Release button that unlocks the primary GPU socket. Even though most users don’t change their graphics card often, that button is high on my list for quality of life changes, as pressing the latch on the back of the PCIe slots can prove difficult, especially on high-end boards with a lot of heatsinks/shrouds and little room to get an adult finger there to press it. I don’t know about you, but I get nervous when I have to stick a screwdriver between the back of the graphics card and some of these heatsinks.
Hardware-wise, both the Extreme and Extreme Glacial are the same. Both have the overbuilt 25-phase VRM, a PCIe 5.0 M.2 socket (plus four others), Wi-Fi 6E and 10 GbE connectivity, flagship-class audio, AniMe Matrix and LiveDash displays, and too many other features to list here. Although the E-ATX-size boards look different due to the water block, they both exude a premium appearance and style that works with most builds. If you’re into RGB LED lighting, both boards have you covered, with the Glacial using a lot more.
Below, we’ll take a closer look at the features of the boards, including the overclocking bits, water cooling block, and any other item that makes the Extreme, well, extreme. Does it have what it takes to make our best motherboards list? We’ll answer that question and share our thoughts on if it’s worth paying such a premium for a motherboard. But first, here’s a detailed list of the Z690 Extreme and Extreme Glacial’s specifications, direct from Asus.
Starting with the Extreme, Asus uses a jet black PCB and heavy metal heat sinks and shrouds that cover an overwhelming majority of the board. The oversized and heat pipe-connected VRM heatsinks surround the socket and reach over the IO area. On top of the VRM heatsink is the customizable Asus AniMe Matrix LED display (a carryover from the company’s ROG Zephyrus G14 laptop), while just below that is the LiveDashOLED to display system information (among other things). The heatsinks around the M.2 sport small bumps to give the board a unique look and increase the surface area to dissipate the heat from the SSDs below.
The right edge is covered by a shroud hiding the horizontal connections for fans and power. The chipset heatsink sports an RGB LED-lit ROG symbol, while under the right edge is an RGB strip that runs the full length of the board. A backplate protects the rear of the board and offers some passive cooling on the VRMs. Overall, the Maximus Extreme is a good-looking board that gives off a premium vibe, but the dot matrix feature is a love-it-or-hate-it feature for sure.
The Glacial takes the premium vibe the ‘base’ Extreme has and takes it to a whole different level. The included monoblock replaces the heatsinks on the board cooling the CPU, VRMs, M.2 socket(s), and the chipset. Around the socket area, the clear plexi gives way to several integrated ARGB LEDs in the block that shine past the prominent silver Asus ROG branding. You still get the benefits of the Matrix LED and LiveDash OLED in the Glacial, and it blends in a lot better here than on the regular Extreme. Between the EK block, horizontal connectivity and shrouds, you can barely see the PCB except where you need to (where there are headers for fan, RGB, etc. The Extreme Glacial is one of the most high-end-looking motherboards available. Both boards beg to be the centerpiece of your PC.
On the ‘base’ Extreme, the VRM heatsinks rise around the socket area like seats in a sports stadium. The large heatsinks offer a lot of surface area and connect via a heat pipe to share the VRM and M.2 socket heat load. On top of the left VRM bank sits the AniMe Matrix LED, while just below that is the 2-inch LiveDash OLED screen. Both can be personalized, with the LiveDash sharing system information (think voltage and speeds) and images, while the AniMe Matrix LED is more for aesthetics and personalization. You can control what these display through the Asus Armoury software. Just above the heatsink are two 8-pin EPS connectors (one required) to power the CPU.
Advertisement
The Glacial replaces the stadium seating-like VRM heatsinks with a nickel-plated EK block that covers and cools the VRMs, CPU, and the top M.2 socket. The gloss finish reaches out over the IO panel and down to the top VRM socket which yields an even more premium look. The AniME Matrix and LiveDash OLED have a much cleaner implementation on the Glacial since it’s integrated into the block. RGB LEDs shine brightly through the thick acrylic block, backlighting the ROG symbol branding.
To the right of the socket, both motherboards look the same and have the same features. There are four unreinforced, single-side locking DRAM slots supporting up to 128GB of DDR5 with speeds listed to DDR4 6400+. Of course, your mileage will vary as reaching these speeds depends on the memory kit used and having a CPU with an integrated memory controller capable of doing so. We had no issues with our ADATA DDR5 6000 kit using XMP.
Above the DRAM slots are three (of eight) 4-pin fan/pump headers. In this case, we have the CPU_FAN, CPU_OPT, and CHA_FAN1P headers which are Q-Fan controlled by default. These headers (and the rest of the chassis fans and rad fans) support up to 1A/12W. The two pump headers (W_PUMP+1/2) output up to 3A/36W, supporting nearly all pumps designed for PC watercooling.
All of the holes on the board to the right are for the Asus ProbeIt functionality. With these, you can use a multi-meter to check voltages more accurately compared to software. ProbeIt covers all major voltages, including VCore, VIn, VDD, SA and several others. While most users don’t need this level of granularity and accuracy, I want to see everything Asus has to offer on the flagship and am happy to see it here. For those who truly push the limits of their processor, this is a useful tool to have.
Sitting between the right edge of the board and DRAM slots is the DIMM.2 socket. This slot houses the included DIMM.2 module which adds two additional M.2 sockets to the board. The add-in-card–which looks like RAM–runs at PCIe 4.0 x4 speeds for each module and supports up to two 110mm PCIe storage devices.
Along the right edge, the Extreme(s) sport a plastic shroud that covers the unsightly connectors and simple buttons. A 2-character debug LED is visible from the top, along with rectangle-shaped Start (power) and reset buttons. Sitting horizontally under the shroud are two 4-pin fan headers, the 24-pin ATX connector to power the board, and a supplemental 6-pin PCIe connector for additional board power for multi-GPU configurations. Also located here is the new 6-pin Gen2 addressable RGB connector that fits RGB WS2812B or WS2812B-based LED strips at up to 3A(5V). Sticking up around the shroud is a front panel USB 3.2 Gen 2x2 (20 Gbps) Type-C header.
The air-cooled Extreme also has the PCIe slot Q-Release button that unlocks the primary GPU socket. Even though most users don’t change their graphics card often, that button is high on my list for quality of life changes, as pressing the latch on the back of the PCIe slots can prove difficult, especially on high-end boards with a lot of heatsinks/shrouds and little room to get an adult finger there to press it. I don’t know about you, but I get nervous when I have to stick a screwdriver between the back of the graphics card and some of these heatsinks.
Source: www.tomshardware.com
Useful Links:
